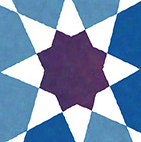

Fold a square of origami paper in half, unfold, fold it in half the other way, and unfold. Now fold the corners to the centre. Turn it over and repeat. You may be reminded of folding what’s often called a cootie catcher or fortune teller. You end up with the leftmost module in the picture above: a half-size coloured square, with four square flaps that can be manipulated. The other four modules are variations that you can get by manipulating the flaps symmetrically. It isn’t hard to see that the proportions of white paper showing in these five modules are 0%, 25%, 50%, 75%, and 100%.
Now think about halftoning, the representation of a greyscale image using only two tones. Many forms of halftoning involve dividing the image into cells, and placing a two-toned object in each cell (say, a variable-sized black mark on a white background) for which the relative amount of white corresponds to the brightness of the image in that cell. From a distance, your eye is willing to fuse the pure black-and-white (well, blue-and-white) information into a smoother continuum of grey levels. At low resolutions, the result produces a pleasing tension between seeing the entire image, and seeing the individual modules that make it up.
Origami is the art of folding a piece of paper into something interesting. Modular origami uses many pieces of paper, all folded into simple modules and assembled into a single large object. Modular origami halftoning, then, would be the use of a set of variably toned modules to represent a greyscale image. The modules above must be glued to a large piece of backing paper, in an egregious violation of the traditional practice of origami, but oh well.
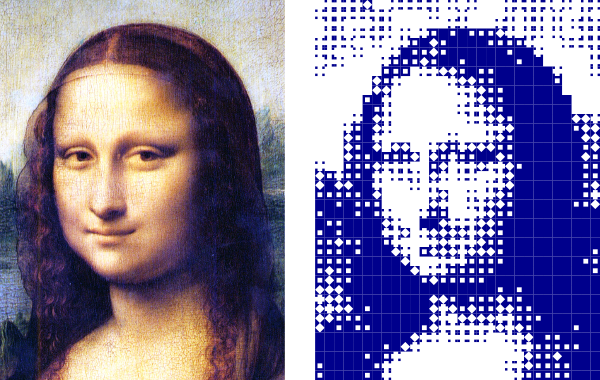
For a weekend hands-on workshop in New York City I developed a group halftoning activity based on these modules. I wrote some code (using Python and the Python Imaging Library) to take an image, convert it to greyscale, scale it down to tiny resolution, and quantize the brightness to five levels. I could then visualize the image as it would appear rendered in origami modules.

I didn’t tell workshop participants what image they’d be creating. Instead, they were simply given one row of the image as a list of modules to fold: “1 3/4 3/4 3/4 3/4 1/2 1…”. The idea was that everyone would collaborate over my three one-hour workshop sessions to finish this 30 x 40 = 1200 pixel image.
Of course, never having given this workshop before, and having no way of knowing how many participants I’d be getting or their skill levels with paper, it was impossible to predict how far we’d get. But it seemed reasonable to me that we’d be able to finish one of these. As it turns out, I was far too ambitious with this activity. Over the three hours I had, we collectively managed to fold about half of the needed origami modules, and assemble about a quarter of them into the finished composition.


There was some debate about what to do at that point. Should I leave the half-finished work at the school where the event took place, and hope that students there could finish it? The school liked the project, but they had no idea whether they’d have the time to get back to it. In the end, I took the canvas, the folded-but-unglued modules, and the rest of the origami paper home, resolving to finish it myself to assuage my guilt over having foisted this quixotic art project on an unsuspecting public.
Gluing is fast, and I easily finished the first 21 rows or so the day I returned from New York. That consumed most of the pre-folded modules, and I was left with the daunting task of folding around 600 cootie catchers myself. In the end I folded about 400 of them; my colleague Steve Mann took the rest of the paper to his computer graphics lecture and had his students fold them during class! At that point it took less than a day to convert cootie catchers into the five needed modules and glue them down, one row at a time. For convenience I had broken the work into three large panels. I then trimmed the excess backing paper and joined the panels together into a single large composition.


These photographs, and a few others, can be found in an album on flickr. You can also download a PDF containing the folding instructions for the five modules.
I’m pleased with the result, though not entirely with the means by which it was achieved. This was probably not an ideal activity for a hands-on workshop after all, though the participants did seem to enjoy themselves at the time. With halftoning as the theme, it seemed natural that everyone should collaborate on a single large composition, but I probably have to find some other means of halftoning where the time needed per pixel is even smaller. Either that, or choose an activity where every participant works on their own artifact. In any case, thanks to the workshop participants and to Steve Mann and his computer graphics students for getting involved.
Incidentally, it’s natural to object that this process violates the spirit of origami: it involves gluing modules to a paper backing. Early in the development of the workshop I shared the idea with Robert Lang, who immediately responded with a brilliant module that has true origami-nature: the modules interlock with each other, no glue needed. Hopefully we’ll be able to create a large composition using those modules, though they’re more difficult to fold.
This workshop was part of a weekend event called MoSAIC. MoSAIC is a new initiative by the Bridges Organization, which oversees the annual Bridges Conference on art and mathematics (I’m a member of the board). The idea is to focus more on public outreach and mathematical inspiration than on the presentation of new academic research. With funding from MSRI, MoSAIC will travel around North America. Anybody can apply to host a MoSAIC event at their school; we will help arrange speakers and workshop leaders, and we will send a small art exhibition and mathematical videos for screening.
Leave a Reply to A Cancel reply